Holy Mending! (Or is it hole-y?) - Part 1
Dear readers! Week 8 and the Summer Sewing Tutorial Series is wrapping up! Thanks so much for being a part of it!
I'm looking forward to sharing more about the day to days of business owning and growing and funning and sillying as summer turns to fall, but I'm excited for one last tutorial today (well, part 1 of 2... :)).
About how to fix the holes that magically (or not so magically) appear in our favorite garments. There are a few different categories of holes that I've recognized (though this list certainly isn't comprehensive):
- Holes in seams (remember the definition of a seam- we learned it two weeks ago)
- Holes right next to seams
- Holes in woven fabrics having nothing to do with a seam
- Holes in knit fabrics having nothing to do with a seam
So I thought I'd walk us through fixing some of the easier ones this week, and save some of the others for Part 2... :)
Holes in Seams
This is just where some stitching broke or came out, but the integrity of the garment and fabric aren't compromised.
All you've gotta do isturn the garment inside out, pin the two pieces of fabric together where they used to join, and sew it up (using a sewing machine, or by hand) following the old stitch line where the garment used to be joined. Good as new!
If you're working on a knit fabric (remember the difference between woven and knit?), you'll get extra credit for using a very narrow zig-zag stitch, so that the seam line will stretch with the fabric. :)

1) Sad armpit hole...
2) Turned inside out and pinned.
3) In the sewing machine I follow the garment's original stitch line and seam allowances.
4)Ta da!
Holes Right Next to Seams
So here, there's a stress point on the garment like on these tights), and the fabric has worn out. I can fix it, but it's going to change the size of the garment slightly (which may or may not jive for your garment's style), and the hole(s) will likely come back. But it'll last a little while longer :)
- Just like above, turn the garment inside out
- Pin the two pieces of fabric together just to the inside of the holes
- Use chalk (if you want, or you can eyeball it) to draw where your new stitch lines will be. Try to make a gradual line from where the fabric is currently stitched together out towards where the holes live. You'll want to stay as close to the holes as you can without sewing over weakened fabric. I'll go about 1/4" from the holes.
- Stitch along the line you drew and turn right side out. I did a super narrow zig zag so that it would stretch with the tights' fabric. You did it!

1) Hole. Boo.
2) Turned inside out, pinned, and the stitch line re-drawn with chalk
3) Sewing!
4) Ta da!
Holes in knit fabrics having nothing to do with a seam
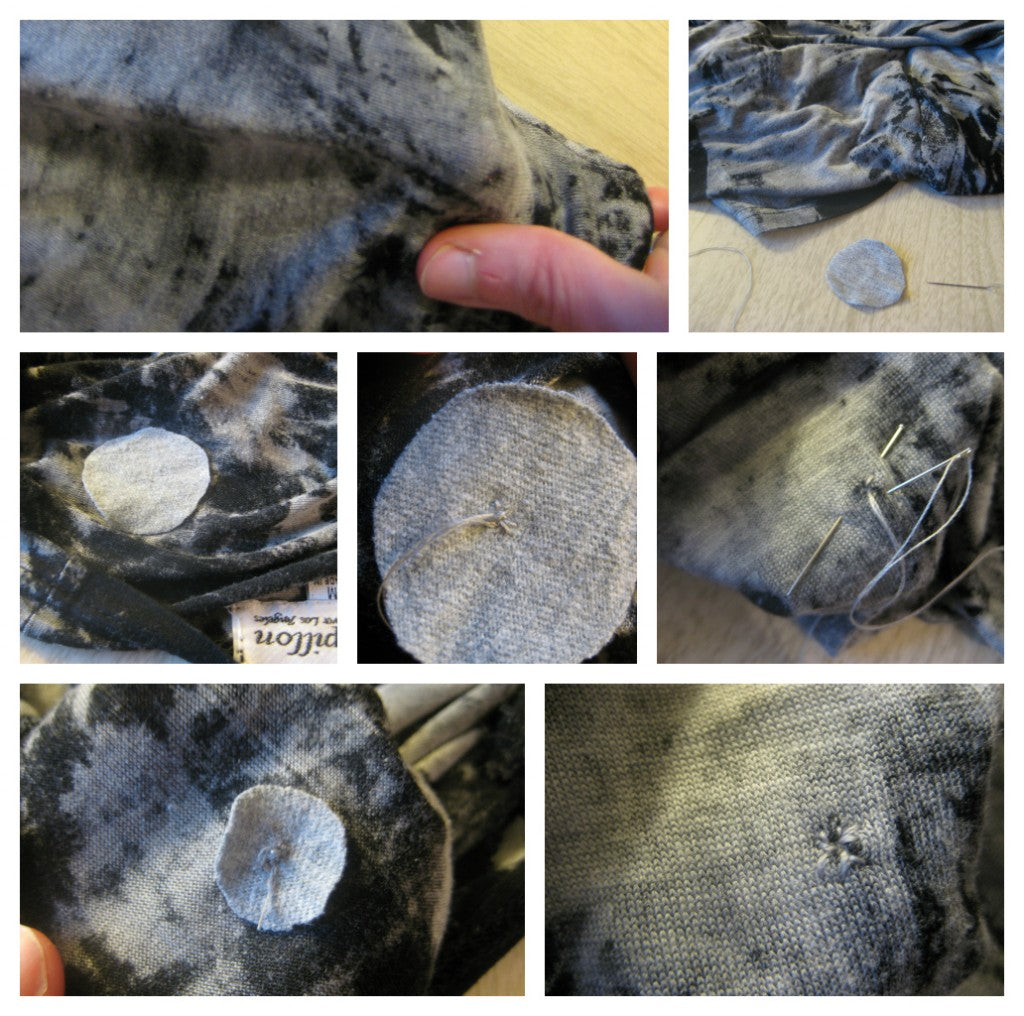
These ones can sometimes be hideable, depending on where and what type of fabric. Here's a little cardigan with a mini-hole I'll patch from the back
- Cut out a little patch and put it behind the hole. Try to choose fabric of similar type/weight. I'm not folding the edges of my patch under here- it would add bulk and my tshirt patch won't ravel anyway, so I'm just going to leave it like you see in the photo (and trim it down a little bit when I'm finished).
- Put a knot in your threaded needle and start from the inside of your garment. I always sew around the little hole like the petals on a flower- from the outside to the center. Check it out in the photos below.
- After I've gone around the hole, I come back to the inside of the garment and knot my thread off just like I did when we were sewing a button.

Row 1: The hole and our materials!
Row 2: My patch and flower petal stitching
Row 3: The finished product, inside and out :)
If it's a casual garment, or has a print like this one, it may not be noticeable at all!
Well, what do you think? Do you have any clothing you'll be patching soon? I'd love to hear about it! Please comment below :) And see you next week!
xoxo


