[Free Download] And, cut (your pattern out)!
This week, the grand unveiling of our summer sewing project! Drumroll please!
A supersweet upcycled shopping bag!
I'm also pleased to introduce my husband Zac who wants to learn to sew (he's got big dreams of making his own camping gear). He offered to be my guinea pig and model for this project, and he's just as excited as you are! :) So here we go!
You'll need:

Step 2: Next, let's dive in to prepping our paper pattern pieces! You have two options here-
- a tshirt (any size will do; ours was a child's large)
- 2/3 yard of fabric (either 45" or 60" wide) if your tshirt is less than 18" wide. If your tshirt is wider than 18", you'll want 3/4 yard. We're using two different pieces, since we had some scraps lying about. You could also use clothing, but part of today's lesson will be cutting on grain.
- Some newspaper if you're making your own pattern (I explain the measurements you'll need below), or you can download the pattern I used here- you'll need to tape it together and adjust it for the width of your tshirt. Don't worry, it explains how to. :)
- A measuring tape or ruler or both
- Scissors
- A marker or pen
- Fabric/sharp scissors (nothing dulls scissors faster than paper, so my fabric scissors are used for nothing but fabric. It's one of our house's cardinal rules. Seriously. Don't cut paper with my fabric scissors. You will pay. :))
- Pins
- Ours is 15.75" wide, and the pattern download is made for a shirt that's 15.75" wide.
You can either make your own newspaper patterns like I did, or print out a copy of my pattern, and follow the instructions therein to make the adjustments you'll need. Either way, you'll rock it: if you have a straight edge ruler and a calculator (or super fast arithmetic brain :)) I say go for making them yourself. Otherwise, kick butt on taping those 8.5"x11s" together, and then follow the instructions to make adjustments for whatever size shirt you have. One note: if you use the pattern download, it has notches (peek back at our pattern markings glossary if you need a refresher) and you'll have a chance to practice matching them. :) When you cut your pattern pieces out, go around them. Make little triangles sticking out of the fabric, just like they look like :)
If you're making the pattern yourself, cut out 3 rectangles of newspaper, and don't forget to label them! Check out the grainline on the download- make your's parallel to one of your pattern edges- it doesn't matter where your's is, as long as it is in the correct direction.
- 1 for straps (or maybe you could use an old belt?) We liked 24" long by 3.5" wide
- 1 for the bottom band (that gray houndstooth on the photo above) Take the width of your tshirt in inches, add 1.25", and make a rectangle that length by 11.625" (.625" = 5/8" if you're reading your ruler)
- 1 for the top band This rectangle should be the width of your tshirt + .625" long x 3.5" wide
Step 3: Pre-wash, dry and iron your fabric (if you haven't already). It's best to always iron your fabric before cutting something out. Exceptions are if you are using fabric that can't be pre-washed (like if the care instructions are dry clean only); then you might not need to.
Step 4: Cut the hem off your tshirt! Here we go (top 2 photos)!
Next cut off the torso of the tshirt just below the armpits. Use your straight edge and draw a line from armpit to armpit right on the shirt if you don't have nice lines to follow like we did :) You've got your bag middle!

Step 5: Lay your fabric out folded in half with the selvages together.
Try to get the selvages perfectly match for the entire length of your fabric. Smooth the fabric out so that it's not lumpy. If your fabric is lumpy near the fold, it might've been cut off grain, and you can check out the video from last week for tips on how to straighten it out.

Remember what the selvage looks like? It's the edge that's a bit more tightly woven, and perpendicular to where they cut the fabric at the fabric store.
Step 6: Now we'll start positioning pattern pieces on the fabric; we'll mimic the diagram provided in the pattern (also below. Note that two different sizes are shown in the layout diagram below, click to enlarge.) For part of the cutting you'll have the fabric folded in half, and for the last piece, you'll have the fabric laid out so that it's only one layer thick. Remember that the grainline on each of your pattern pieces should be parallel to the selvage. Whew! It's not as complicated as it sounds, I promise!

Step 7: (The next couple steps are interchangeable- I'm just going to pick a pattern piece and start with it :))
Put the edge of the bag top band piece (pattern piece number 2) on the fold.
Pin each corner down, and smooth the pattern piece to the other two corners. Pin those corners down, then go back and pin the middle of the piece.
Use pins every couple of inches- you want to make sure that the fabric doesn't slip around while you're cutting the piece out.
But don't cut yet- let's get the other pattern piece pinned down first.

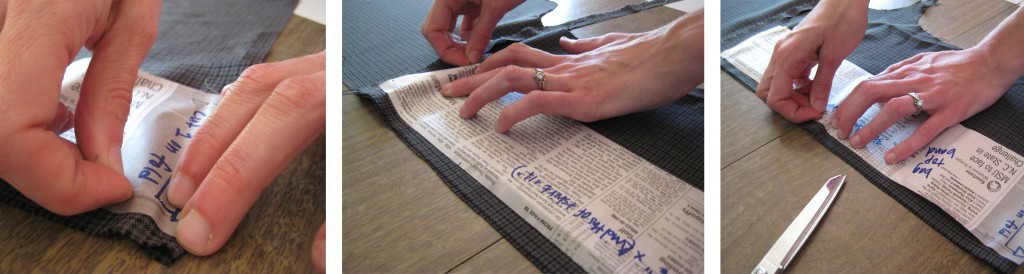
Step 8: Let's pin the bag straps, pattern piece number 3. Zac and I used a different fabric for this one, but your steps will be the same. Because it's a scrap and the selvages were gone, we ripped the fabric along the grainline like I showed you in last week's video and are pretending that that's our selvage. Make sense?
 Pinning the bag straps- pinning on grain
- Pin the pattern piece to the fabric right at the arrow on one end of the grainline.
- Measure from the grainline to the selvage/edge of the fabric. Remember this measurement; in our photo, it's 1.875", so that's the measurement I'll use as I explain how to do this below :)
- Now, smooth out the pattern piece down the grainline to the other arrow. At the other arrow, measure from the grainline to the fabric's edge. If it's not 1.875" or whatever your measurement was, use the pin anchoring the other grainline arrow as a pivot point to slide your pattern piece closer to or further away from the edge of the fabric until the measurement matches- now you know that your pattern piece is perfectly on grain! Pin the pattern piece to the fabric when the measurement from the selvages match at top and bottom.
- Now pin along the center of the grainline (you can check here too to make sure that it's still the same measurement away from the selvage- this is especially important if you're working with a super long pattern piece, or super slippery fabric).
- Next, smooth out from the grainline to the four corners of your pattern piece. Pin the four corners down.
- Now pin along the edges so that the fabric won't slip as you cut it out.
- Hooray! You did it!
Step 9: Cut these suckers out! It is time to cut! The last pattern piece will only be on one layer of fabric, so we'e gonna cut these two pieces out. On the straps, pattern piece number 3 (bird fabric above & below), cut along all 4 edges of the pattern, right next to the paper. On the top band, pattern piece number 2 (grey houndstooth above and below), cut along the three edges that aren't the fold. DO NOT cut on the fold line! :)
Step 10: Lay out the bag bottom panel (pattern piece 1) We only need one of this piece, so we can unfold our fabric, and although we might have just made the selvages disappear when we cut out the other fabric pieces, those pieces were cut on grain, right? And since the pattern pieces were straight lines, we can use them to measure the grainline from for this piece. Make sense?

- Pin the pattern piece to the fabric right at the arrow on one end of the grainline.
- Measure from the grainline to the edge of the fabric. Remember this measurement; in our photo, it's 6.375", so that's the measurement I'll use as I explain how to do this below :)
- Now, same as before, smooth out the pattern piece down the grainline to the other arrow. At the other arrow, measure from the grainline to the fabric's edge. If it's not 6.375" or whatever your measurement was, use the pin anchoring the first grainline arrow as a pivot point to slide your pattern piece closer to or further away from the edge of the fabric until the measurement matches- now you know that your pattern piece is perfectly on grain! Pin the pattern piece to the fabric when the measurement from the selvages match at top and bottom.
- Now pin along the center of the grainline.
- Next, smooth out from the grainline to the four corners of your pattern piece. Pin the four corners down.
- Now pin along the edges so that the fabric won't slip as you cut it out.
Step 11: Cut this piece out! Since this one wasn't on the fold, we'll cut around all four sides. Cutting the last piece - so close! Boom. You just cut out the pieces to make a super sweet bag! Zac with his pattern pieces!
 Zac with his pattern pieces!
Hang tight with those pieces- swing by next week for sewing machine basics, then again on June 28th for sewing instructions (or sign up to get updates emailed on the homepage :))! Can't wait to hear how your bags will turn out! Have any questions or thoughts? Please comment below!
Leave a comment
Recent Articles
© 2026 La Vie en Orange. Powered by Shopify


X
