Presto Change-o Shopping Bag! Part 1
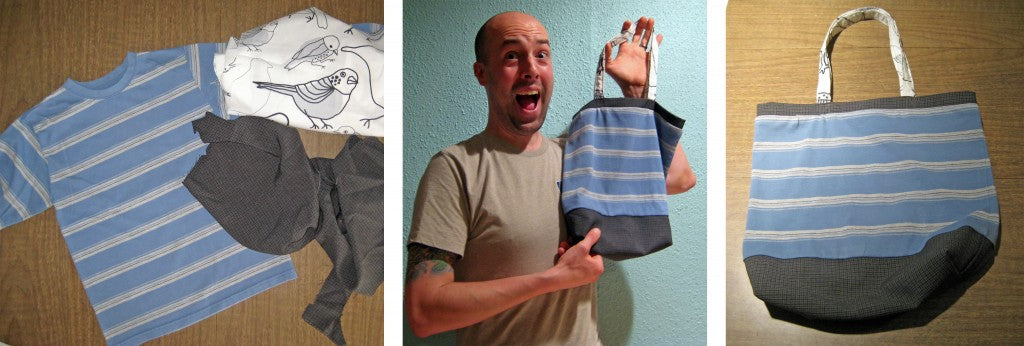
Before and after! :)
You made it! Week 6 of our Summer Sewing Tutorial Series- Making our shopping bag!
We've waited so long to get here, let's just dive in! :) Husbie Zac will be our guinea pig and model again this week. So, without further ado...
Grab your pattern pieces from week 4 when we cut our pattern out. Remember these? 
Zac with his cut out pattern pieces! What do yours look like?
You'll also need:
- Thread that matches your project
- Pins
- A ruler
- A colored pencil, pen or sewing chalk
- A safety pin
- Your threaded sewing machine, bobbin and all (for a how to, check out last week's post)
- An iron
- An hour or two :)
A seam is where two or more pattern pieces join with a row of stitching (you might've heard of side seams before? On a skirt, this is where a skirt front and skirt back fabric pieces join together on the side of your body). This pattern calls for 5/8" seam allowances (which are pretty standard for home sewing).
What is a seam allowance? It is the amount of fabric you leave between the row of stitching that you make with the sewing machine, and the edge of the fabric pieces. If it doesn't already, it'll all make sense in a minute. You can't stitch right on the edge of the fabric, it's always got to be just a little bit off. And your sewing machine will have marks like the ones pictured below that act as a guide to help you keep your stitch line straight (for more practice/help sewing a straight line and how to use these guides, check out the video tutorial here).
To help Zac keep his line of stitching straight, I put some blue painter's tape on my sewing machine to extend the 5/8" guide.

Check out these seam allowance guides next to the presser foot- you'll notice Zac pointing to 5/8", but there are also other measurements labeled too.
Step 1: Prep Bag Bottom
Alright! So to get started, you'll want to take your bag bottom (piece #1 from the pattern download), and fold it in half right sides together*, matching your notches.
You'll notice that if you fold it in one direction, the notches won't match, but if you fold it in the other direction, they do. That's how notches work- they help you make sure you're putting things together in the right direction! :)
*Rights sides together is a super basic sewing concept that will all make sense in a moment. So most fabrics have a "right" side and a "wrong" side. The right side is the side you want the world to see, while the wrong side is the side that doesn't have the print, or looks funny, or is whatever you want on the inside of the garment. So when you're sewing, you typically don't want your seam allowances (described above) on the outside of your garment or shopping bag. (It would be like wearing your clothing inside out). The way that you get the seam allowances on the inside of your bag or garment is by sewing with right sides together. It means sewing on the wrong side of the fabric, with the right sides of your fabric pattern pieces folded together (if there's folding involved, like in this step), or laid together so that they face one another (like we'll do in the next step). This means too that you'll always usually have to turn the garment (or bag) right side out at some point during the process. Which is super fun! :)

Zac has his bag bottom folded in half- yours should appear in similar proportions :)
You'll want to pin the sides together to hold them in place. Too many pins and it'll slow you down a ton while sewing, too few and your fabric will be slip sliding allover while you're trying to sew.
Check out the video below to see where/how Zac pinned his fabric. He left the pin heads off the edge of the fabric so that they'd be easier to pull out as he was sewing, and so that if he accidentally sewed over a pin, it wouldn't cause problems. Not a bad idea! :)
If you measured your own pattern pieces rather than using the download (and so don't have notches), you'll want to fold the bag bottom so that the fold is in the side that's 11.625" wide. You want a long skinny piece after you make the fold, like the photo above.
So now you're going to sew along the two short edges of this bag bottom piece. Watch Zac do his second in the video below. Remember, if you need some guidance taking that first stitch, this video will be a big help!

Hooray! You did it! Now iron those two seams open (you don't want to iron the seam like how you sewed it- flat- you want to iron it open so that it's one layer thick. Make sense?), and move on to step two! :)

Step one is done! We also used a serger to stitch in white on the edges of our fabric to finish them so they wouldn't fray. You can achieve a similar effect by doing another row of stitching with your sewing machine (zig-zag is good for this- refer to your manual for getting into zig-zag mode) right on the edge of the fabric. It'll keep it from fraying when you throw your bag in the washing machine.
Click here to continue to part 2 for the rest of the instructions.
Leave a comment
Recent Articles
© 2026 La Vie en Orange. Powered by Shopify